
Upscale Video and Image and clips: Have you ever looked at an old blurry video or a low quality photo and wished it looked sharp and clear like new 4K content Many people face this problem with family clips phone recordings or old anime scenes The good news is that AI tools can help improve the quality step by step In this guide you will learn a simple way to turn 480p or similar
low resolution material into much clearer 4K output The process stays open and local so your files stay private This method uses an open source tool called Video2X It works for both videos and images You can run it on your own computer or use an online notebook if your machine is not strong enough The steps stay easy and the results often look smoother with higher detail
What Video2X Does and Why It Helps
Video2X takes each frame of a video or a single image and uses trained AI models to add missing details
It does not just stretch the picture
Instead it rebuilds edges textures and fine lines so the final look becomes sharper
You can also increase the frame rate for smoother motion People use it for old home videos game recordings and animation
The tool supports several AI engines such as Real ESRGAN for real life footage and Real CUGAN for 2D style content
Anime4K helps with animation and RIFE can fill in extra frames Hardware needs stay reasonable
A graphics card that supports Vulkan works well
Even older cards can handle smaller files
If your computer struggles you switch to the online method later
Preparing Your Files Before You Start
Choose a short clip first so you can test the process
Save the file in a common format like MP4
Make sure the original is not too long because processing takes time
For images use PNG or JPG Clear some space on your drive because the output file grows larger
Close other heavy programs so the tool has enough power
Install Guide for Windows Computers
Visit the official project page on GitHub
Look for the releases section
Find the Windows installer file and save it to your computer
Run the file and follow the simple on screen steps
The process finishes in a few minutes After install open the program from the desktop icon
The main window appears ready for your file
Step by Step Upscaling on Your PC
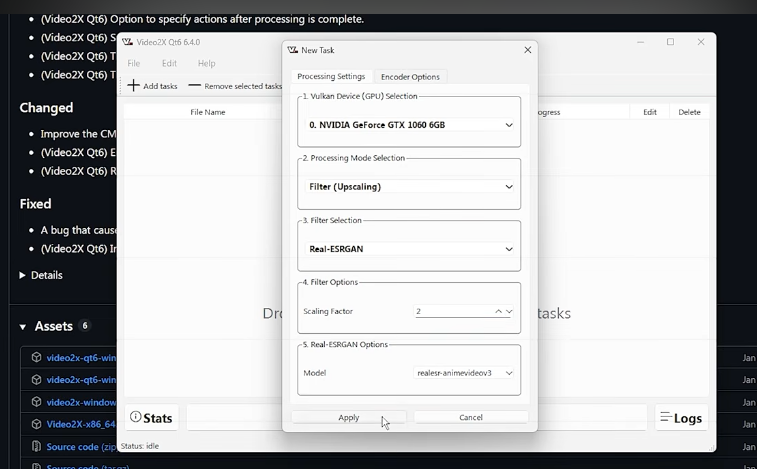
Import your video or image by clicking the add option
A settings window opens
Select your graphics card from the list so the tool uses GPU power Set the processing mode to filter upscaling
Choose a scaling factor such as 2 or 4 depending on how much quality you want
A factor of 4 works well for moving 480p material toward 4K Next pick the filter that matches your content
Real ESRGAN suits live action and photos
Real CUGAN often gives better line quality for animation Click apply to save the choices
Then press the start button
The tool begins working frame by frame
A progress bar shows how far it has gone When it finishes the new higher quality file appears in the output folder
Play it and compare side by side with the original
You should notice clearer details and smoother motion if you also raised the frame rate
Using the Google Colab Method When Your PC Needs Help
Some computers lack strong graphics cards
In that case open Google Colab in your browser
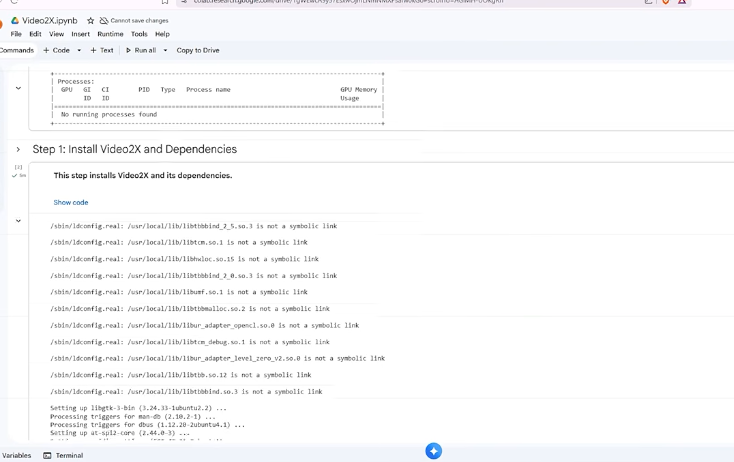
Search for a ready Video2X notebook that the community shares Run each cell one after another
The first cells set up the needed tools
When asked give access to your Google Drive so the notebook can save files Upload your video or image through the upload button
Wait until the transfer finishes
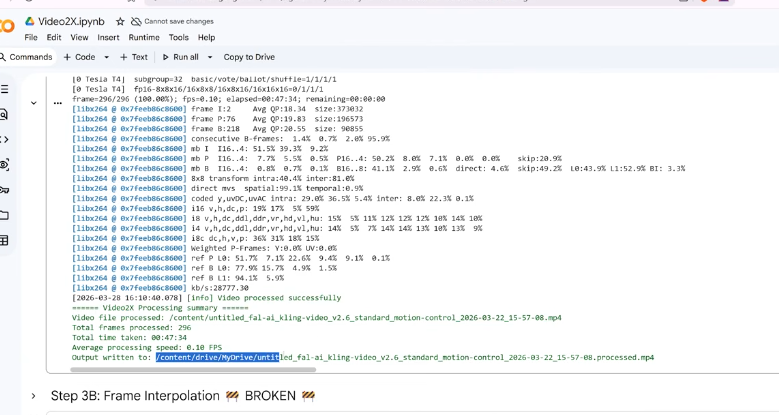
Then run the upscale cell
Choose similar settings for scale and model Processing happens on Google servers that provide temporary GPU power
Time varies with file length and chosen scale
Short clips finish faster Once done the improved file lands in your Drive folder
Download it when ready
This path keeps everything free of charge within fair use limits
Helpful Tips for Better Results
Start with a clean source
Heavy compression or strong noise can limit what AI can recover
Test different models on a short section before full runs Higher scale factors take longer and need more memory
A 2 times scale often gives a good balance
Add frame interpolation only when you want smoother playback Watch temperature on your computer during long jobs
Give the machine breaks if needed
Save intermediate results so you can restart without losing work For images the same steps apply
The tool treats them as single frames and outputs sharper versions quickly
Common Challenges and Simple Fixes
If the program does not see your graphics card update the drivers
Restart the computer and try again Long videos may stop if memory runs low
Split them into shorter parts and join later with free editors Output files can look soft if the wrong model is chosen
Switch engines and compare small samples Online notebooks sometimes disconnect after long idle time
Keep the browser tab active and check progress often
Why This Approach Feels Practical
Many people enjoy restoring old memories without complicated software
Video2X stays open source so updates come from the community
You control every step and keep full ownership of the files The mix of local install and online option covers different computer setups
Results improve over time as models get better Try a short personal clip first
See the difference yourself
Then move to longer projects with confidence unlick
Quick Setup
| Topic | Quick Information |
|---|---|
| Tool Name | Video2X |
| Main Purpose | Improves the quality of low-resolution videos and images using AI |
| Video Quality | Can upscale 480p and similar low-resolution videos to much higher quality |
| Image Support | PNG, JPG, and other common image formats |
| Video Support | MP4 and other common video formats |
| AI Models | Real-ESRGAN, Real-CUGAN, Anime4K, and RIFE |
| Best for Real Videos | Real-ESRGAN works well for photos and live-action footage |
| Best for Anime | Real-CUGAN and Anime4K are useful for animation and line art |
| Frame Rate | RIFE can add frames to make video playback smoother |
| Upscaling Options | Common options include 2× and 4× scaling |
| 4K Upscaling | 4× scaling can help move 480p footage toward 4K resolution |
| Hardware | A Vulkan-supported GPU can provide better performance |
| Local Processing | You can process files directly on your own computer |
| Online Option | Google Colab can provide temporary GPU power |
| Internet Required | Usually not required for local processing after setup; Colab requires an internet connection |
| Processing Time | Depends on video length, computer/GPU power, and selected scale |
| Best Approach | Test a short clip before processing the full file |
| Privacy | Local processing keeps your files on your own computer |
| Common Problems | GPU detection, low memory, slow processing, and Colab disconnections |
| Quick Fixes | Update GPU drivers, split long videos, or try another AI model |
| Best Tip | Use the cleanest source file possible and test different models before the final upscale |
FAQ
What types of files work best with this tool?
Most common video formats and standard image formats work well. MP4 videos and PNG images are usually the easiest to process.
How long does a typical upscale take?
The time depends on the file length, your computer’s power, and the selected upscale level. For example, a 1-minute 480p video may take a few minutes on a powerful computer but longer on weaker hardware or online tools.
Can I increase both resolution and frame rate at the same time?
Yes. You can use the resolution enhancement mode and a separate frame interpolation mode to make frames smoother. You can run both processes one after another.
Will the process change the original style too much?
Usually, a good model can keep the original look natural. Anime-focused models are better at preserving line art, while photo-focused models work better with real-world scenes.
Is an internet connection required after installation?
For local use, you generally don’t need an internet connection once everything is installed and set up. However, the Google Colab method requires a stable internet connection during the session.
How can I get the best results from this tool?
Start with a short test using the recommended settings. Once you are happy with the result, process the full video or image. This helps you create sharper and clearer content without wasting time.
2 thoughts on “How to Upscale Video and Image and clips to 4K with AI Free login”